Soft fluffy Japanese Milk bread (tangzhong starter)

I love Japanese breads with its light and airy texture, and although artisan breads are very popular here in the US and I love them too (I pretty much love any and all forms of bread), my heart still belongs to Japanese breads. Here is a very simple Japanese milk bread recipe that uses a Tangzhong roux "starter" to create wonderfully soft and fluffy bread!
Adapted from King Arthur
INGREDIENTS
- 43 g (3 Tablespoons) Water
- 43 g (3 Tablespoons) whole milk
- 14 g (2 Tablespoons) unbleached bread flour
- 300g (2 1/2 Cups) unbleached bread flour
- 14g (2 Tablespoons) nonfat dry milk
- 50g (1/4 Cup) white sugar
- 1/2 teaspoon salt
- 113g (1/2 Cup) whole milk
- 1 Tablespoon Instant yeast
- 1 Large egg (about 50-56g)
- 57g (4 Tablespoons) of melted unsalted butter
- Tangzhong: Combine all of the ingredients in a small saucepan and whisk until dry and wet ingredients are combined.
- Place the saucepan over low heat and cook the mixture (about 3-5 minutes), whisking constantly until a thick paste forms. You will know it's done when the whisk leaves visible lines in the tanzhong paste (or tanzhong reaches 65°C with digital thermometer).
- Allow the tangzhong to cool to room temperature before using
- Dough: Combine the tangzhong with all the dough ingredients in a mixing bowl, adding wet ingredients first (tanzhong, milk, egg, and butter), then the dry ingredients, making sure the salt and yeast do not contact. I usually add the flour last and make a well in the middle to add the yeast.
- Mix and knead by hand, mixer, or bread machine until a smooth, elastic dough forms. If using stand mixer, use the hook attachment and mix on low first until all ingredients are incorporated, about 1-2 minutes. At this point the dough will appear lumpy and will be very sticky. Now turn the mixer to medium high and mix until the dough is smooth and doesn't stick to the side of the mixing bowl, about 7 minutes. Mixing on low first prevents flour from flying everywhere and making a huge mess (believe me, I've had to learn from experience!)
- Remove the dough from mixing bowl and shape into a ball. Place the dough ball in a lightly greased bowl covered with cling wrap and allow to rise in a warm place for about 60-90 minutes. Make sure the size of the bowl you use to rest the dough is at least twice the size of the original dough to ensure enough room for rising. To determine if the first rising of the dough is complete, poke the dough to make an indentation. If the indentation does not return to normal (or very slowly), your dough is ready for the next step. If the indentation returns to normal, allow to rise and check periodically.
- Remove the dough from the mixing bowl and gently knead for a few more times. Form the dough into a ball again and divide it into 4 equal pieces (like cutting a circular cake into 4 slices). Form each piece into a ball.
- Place two dough balls into a lightly greased loaf pan, cover with cling wrap and allow the dough to rest for about 40-50 minutes in a warm place.
- Towards the end of the rising, preheat oven to 350°F and brush the top of the rolls with milk or egg wash (beat 1 large egg mixed with 1 tablespoon cold water), and bake for 28 to 32 minutes, until the top is golden brown. The inside of the bread should reach at least 190°F. I usually stick a digital thermometer with a timer into the middle of the bread as it bakes and remove the bread once it reaches between 190-200°F instead of using a timer.
- Once the bread is done baking, remove from the oven. Gently slide the loaves out of the pan transfer to a wire rack to cool completely. It's important that you don't let the bread cool completely in the pan as condensation will form at the bottom of the bread, causing the bottom to be slightly soggy, not appetizing!
- The bread will keep for 2-3 days in a ziplock bag with all the air pushed out at room temperature. Remove the amount you want to eat each time and quickly stow the rest away in the ziplock bag, making sure to push out all the air before you seal. Homemade bread has no preservatives or bread enhancers added and dries out very quickly. Otherwise, frozen bread can keep for up to one month.


|
| Add Water, Milk, and bread flour to small saucepan and whisk thoroughly until no clumps remain.
|


|
| Heat saucepan on low heat while whisking constantly. You will notice the mixture thicken and become paste-like. When the whisk starts leaving lines in the mixture (RIGHT), your tangzhong is done (you can also use a digital thermometer and heat the tangzhong mixture to 65C, the temperature at which it is done) |


|
| (LEFT to RIGHT) Add all the ingredients (wet first, then dry, with the flour being last) except the yeast to the mixing bowl. When adding the flour, try to add it to the center of the bowl and make a little crater in the mound of flour with your fingers (or back of a spatula) and add the yeast into that crater. Mix on slow speed for (level 2 on stand mixer) 1 minute until everything is incorporated and a shaggy mass forms (right) |


|
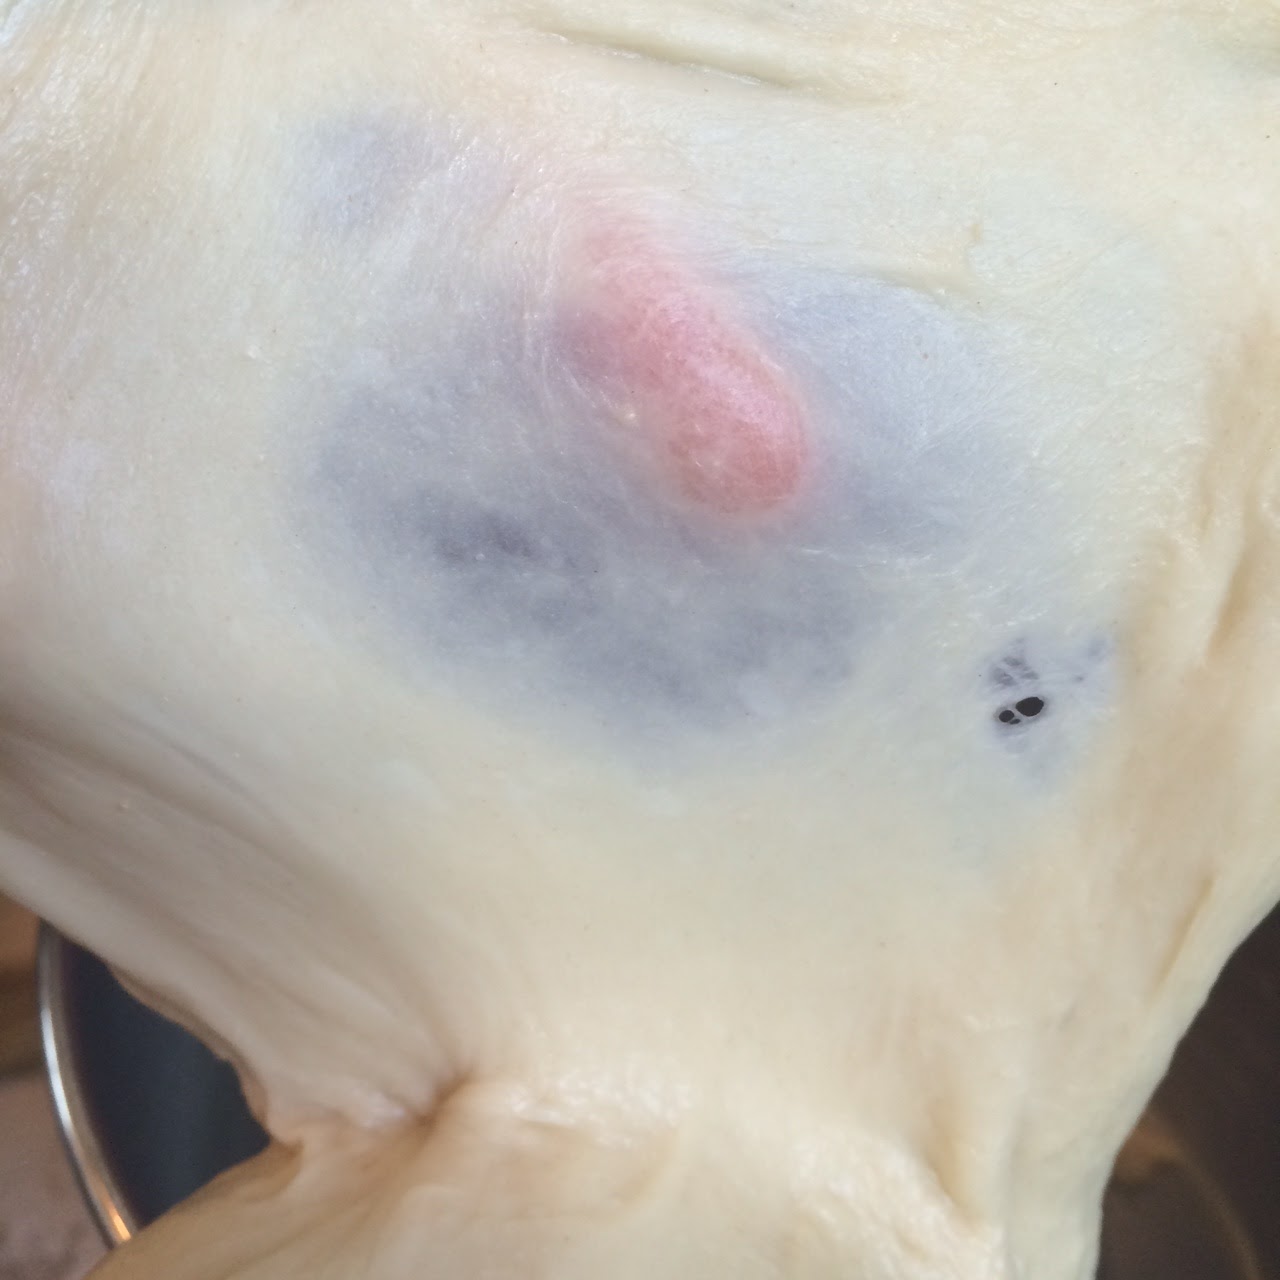
| Now mix the dough on medium high speed (7 or 8) for about 7-10 minutes. The dough will appear smooth and will pull away from the sides of the mixing bowl (instead of sticking to the mixing bowl). You know your mixing is done when you can stretch the dough out to form a see-through film and it doesn't tear (pictured). See how the dough appears smooth and you can see my fingers from behind the dough with no tearing. |


|
|
Form the dough into a ball and place in a large, greased bowl (the bowl
should be at least 3x the size of the dough ball as the dough needs room
to rise). Cover with cling wrap and allow to rise in a warm place for
90 minutes. The dough will rise and expand to not quite 2x it's size
(right). |


|
| Take the dough, shape it into a round, and cut it into 8 equal pieces (like cutting a circular cake). Take each of the 8 pieces and shape it into an oval by pinching the left and right sides together, and then the top and bottom together. Flip the oval around so that the pinched sides are on the bottom and the smooth rounded part on the top. |


|


RIGHT: After Rising. |


|


|


 |
Soft and fluffy Japanese Milk bread ready to be devoured! |


Comments
Post a Comment