Mario Party Favors: Question Box Coin Purse

 Baby Barnaby turned one in June, and since there were three baby boys all born in June, we decided to have a joint one year birthday party! After some discussion, we decided to do a Mario themed party and I offered to make favors. I saw this favor idea on pinterest, but there were no tutorials, so I decided to write one since it’s really easy to make and I’m sure there are tons of Mario themed parties out there that need some homemade favors! You can definitely use a glue gun if you don’t have a sewing machine, but I LOVE sewing and the stitches add a nice touch. Ideally I would’ve stitched the question mark on too, but due to time constraint (and the need to mass produce), gluing was faster. My friend found the chocolate coins at Arny’s (a local party store), but you can definitely find them online at Amazon. This coin purse measures 4”x4” and fits exactly four coins laying perfectly flat (the coins are about 1.25" wide). I found that stuffing extra coins made the coin purse puffy and look weird since the coins would overlap. The kids at the party enjoyed this favor and it definitely added to the decor of the Mario themed party as well.

Supplies:

  • 4 pieces of 12”x18” stiff yellow craft felt* (I got mine from Hobby Lobby)
  • 1 piece of 12”x18” stiff white craft felt
  • Yellow Thread for sewing (if you are sewing)
  • Fabric glue
  • Hot glue Gun with Glue
  • White velcro that’s 3/4” wide**
Notes: 
*I highly recommend using stiff craft felt as they give sturdiness to the pouches, although you may have to check your local craft stores. I have yet to see them at Joanns or Michael's. They do sell stiff craft felt on Amazon, but you have to get a variety pack instead of being able to choose the color you need. Another option is to use yellow and white craft foam and glue the entire thing (no sewing required). Craft foam is readily available in craft stores like Joanns so it may be easier to find than stiff felt.
** Any thickness of velcro will work, and I would recommend the kind that has a sticky back. Since mine were the sew-on kind, I had to use glue gun to stick it on.

First, cut out yellow felt squares that measure 4"x4". I used a roller cutter because they cut so much straighter than using scissors.

Next, cut out the paper pattern of the question mark and trace them on the white felt.

Cut out all the Question marks

Next, cut a long strip of white felt 1/4" wide. These will be for the squares in the four corners. The length of the strip depends on how many pouches you will make. Each pouch needs a 1" piece, so since I made 18 pouches I needed an 18" length strip. If your felt strip isn't long enough that's ok too, just cut 2 or 3 strips of 1/4" width.    
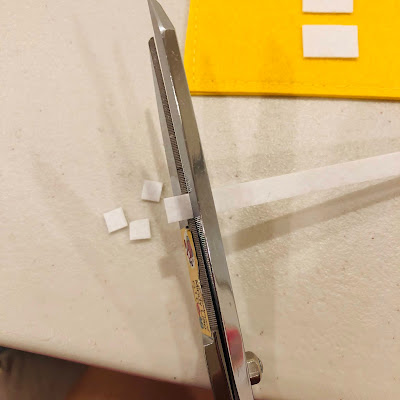
With a pair of scissors, cut the strip into squares that are 1/4" x 1/4". As long as they are close enough to a square shape, they will look fine. The naked eye can't really tell such small differences!
Take two pieces of the yellow felt square and stitch 3 sides together 1/4" from the edge of the fabric. I used the largest stitch size (size 4) as I think it gives a nice look. This is the part where if you don't have a sewing machine you can use a hot glue gun to glue the three sides together.
You'll notice that sometimes when you stitch the two squares together they don't align perfectly. This is completely normal (as we are human and can't cut perfect squares every single time)
When this happens, take the roller cutter (or scissors) and just trim off the excess fabric.
This is what the felt squares look like after they are stitched.
Apply fabric glue to the felt question mark and start gluing them to the yellow pouches. I used a plastic knife to help smear my glue in a thin layer, making sure i get the edges. Make sure you glue to the top edge of the question mark to align with the opening of the yellow pouch where the coins will go in.
You can eyeball where the top of the question mark goes, but it's about half an inch from the top.
Glue the rest of the squares to the corner of the pouch and you are almost done!
Cut 1/4" width velcro strips to glue on to the inside of the coin pouch.
Glue the velcro strips to the inside of the pouch (I used a glue gun), drop in your coins and your coin pouch is complete!


Fun favors!


Question Mark Pattern


Comments

Popular Posts